
Mission Improbable...
76,461
pages on
this wiki
this wiki
|
| Journal Category | World Event | ||||
| Journal Level | Scales with player level | ||||
| Journal Difficulty | Solo | ||||
| Starting Zone | Frostfell Wonderland Village more | ||||
| How to Start | Hail Aildiun Mawdrun behind the wardrobe inside Frostfell Wonderland Village | ||||
|
|||||
NOTE:
 A
discussion page
exists which may contain more information
A
discussion page
exists which may contain more information
|
|||||
What does this information mean?
Notes
 Edit
Edit
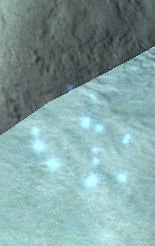
- The spots to place the listening devices are marked with small blue sparkles. Placing the listening devices does NOT drop your disguise. If you for some reason lose the disguise and need to use Stealth or Invisibility, placing the listening device WILL drop Stealth or Invisibility.
- Picking up purple glowing question marks in the zone WILL drop the disguise you put on when you entered the zone (you can pick up the same shinies in the other 2 versions of the zone too).
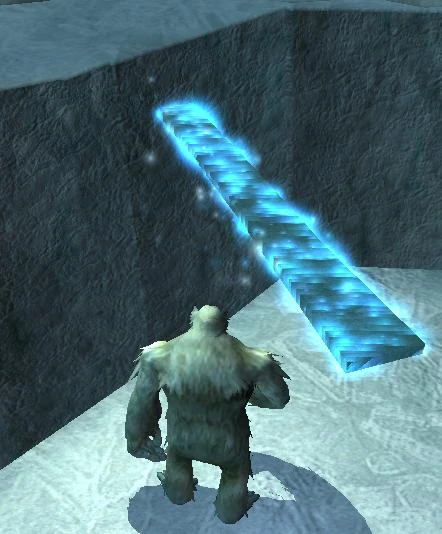
- Movable boards appear in various locations throughout the zone that will allow you to walk or jump shorter distances across wide chasms. If a location seems unreachable, look for a blue, glowing, movable board and place it to make the jump shorter. Use mouse wheel to spin board and keep fat end on rock side.
- Using Spring-Loaded Gnomish Stilts will let you jump far enough to ignore the need for the movable board in this particular mission. It may cause some odd pet or merc pathing issues though when you jump the long chasms.
Steps
Edit
Device location
Plank placed
-
Zone into
The Icy Keep
which is the doors directly left of where you enter Frostfell Wonderland Village at Loc ( 103, -4, -1144 )
/waypoint 103, -4, -1144
 .
.
-
On zone entry, harvest and skin the dead yeti laying in the snow immediately to your right as you enter the zone.
- If you kill any of the creatures in the zone it will activate a 30 minute quest success / fail timer.
- It is still possible to finish the quest within 30 minutes even with the timer active.
- Examine (use) the pelt that appears in your inventory. You will now take on the illusion form of a yeti and the pelt disguise in your inventory will disappear.
- Follow path to the right to enter the courtyard through a hole in the east wall
-
Device Locations in the order you will encounter them:
- ( -106, 1, -188 ) /waypoint -106, 1, -188 north side of chasm at courtyard entry hole
- ( -21, 1, -119 ) /waypoint -21, 1, -119 between towers by barricade
- ( -10, 1, -78 ) /waypoint -10, 1, -78 between towers against south wall
- ( 90, 0, -80 ) /waypoint 90, 0, -80 inside west tower at bottom
- ( 82, 15, -71 ) /waypoint 82, 15, -71 inside west tower at top
-
pick up plank at ( 99, 0, -88 )
/waypoint 99, 0, -88
to cross chasm to east tower - N.B. it only reaches one way round!
- ( -76, 1, -109 ) /waypoint -76, 1, -109 inside east tower at bottom
- ( 17, 19, -60 ) /waypoint 17, 19, -60 end of upper walk exiting west from tower
- ( -81, 27, -104 ) /waypoint -81, 27, -104 roof of east tower in alcove
- ( -21, 20, -216 ) /waypoint -21, 20, -216 end of west walk along castle wall
- ( -166, 20, -197 ) /waypoint -166, 20, -197 end of east walk along castle wall
- Return to Aildiun for your reward.
Rewards
Edit
- Frozen Token of E'ci
-
Choose one of the following - SAVE these weapons for future use in the group version of the zone, as they are
needed
as part of the strategy to defeat the many of the "bosses" in that version.
- Levels 70 - 90:
- Levels 60 - 70:
- Levels 50 - 60:
- Levels 40 - 50:
- Levels 30 - 40:
- Levels 20 - 30:
- Levels 10 - 20:
- Levels 2 - 10:
